Are you wondering how to take a screenshot on your MSI laptop? Whether you want to capture an image of what’s on your screen or share something with a friend, taking screenshots is a quick and easy way to do it. In this guide, we’ll show you how to take screenshots using the keyboard shortcut and the integrated software. Let’s get started!
1. How to take a screenshot on an MSI laptop using the Windows key and PrtScn button
One of the easiest and quickest ways to take a screenshot on an MSI laptop is by using the Windows key and PrtScn button. Simply press the Windows key and PrtScn button together on your keyboard to capture the entire screen. You can then paste this screenshot into a document or image editor of your choice, such as Microsoft Word or Photoshop, for further editing and sharing.
2. How to take a screenshot on an MSI laptop using the Fn key and PrtScn button


If you prefer to use the Fn key on your MSI laptop instead of the Windows key, you can also take screenshots using the Fn key and PrtScn button. Simply press the Fn key and PrtScn button together on your keyboard to capture a screen image of your entire screen. You can then open this screen image in your preferred image editor or share it with others for editing and review.
3.How to take a screenshot on an MSI laptop using the Snipping Tool


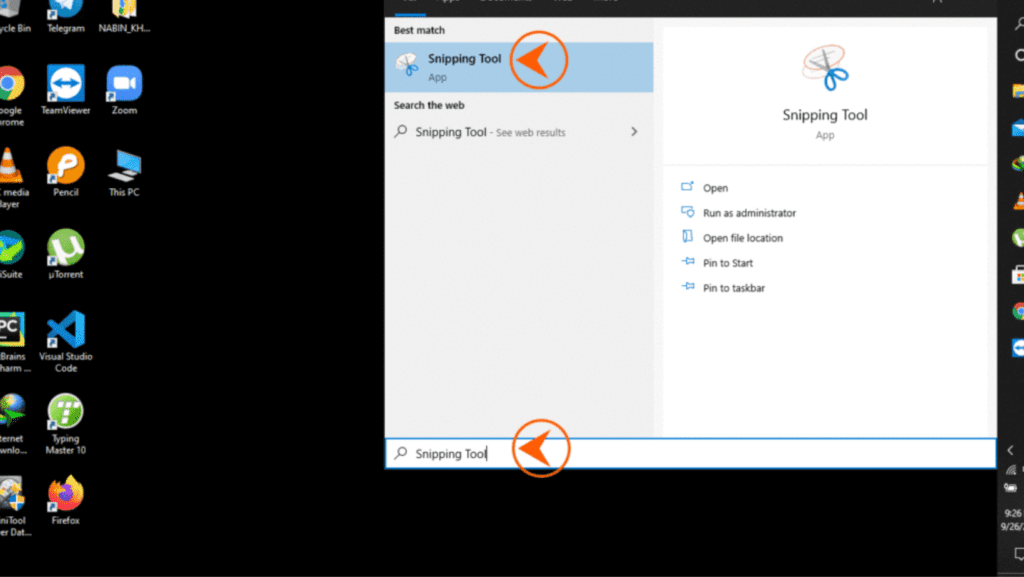
If you want more advanced screenshot capabilities, such as the ability to capture screenshots of specific windows or portions of your screen, you can use the Snipping Tool on your MSI laptop. To do this, simply open the Snipping Tool by searching for it in the Start menu and clicking on it. Once the tool is open, select the type of screenshot you want to take, and then click and drag your mouse to select the area you want to capture. You can then save this screen image, annotate it, or share it with others as needed.
Whether you prefer using the keyboard shortcut to capture screenshots on your MSI laptop, or use a more advanced tool like Snipping Tool, there are many great options for capturing and sharing screen images. Ultimately, the method that works best for you will depend on your specific needs and preferences. So give each option a try and find out which one you like best!
How to take a screenshot on Windows 11 MSI
Opening the Snipping Tool:
1. Open the Windows or Start menu on your MSI laptop, and type “Snipping Tool” into the search bar.
2. Select the Snipping Tool from the search results, and click on it to open the tool.
3. Next, select the type of screenshot you want to take using the Snipping Tool. You can choose from a free-form selection, a rectangular selection, a window or menu selection, or a full-screen capture.
4. Once you have selected your desired screenshot type, use your mouse to select the area of the screen that you want to capture.
5. When you are done selecting the area, click the “Save” or “Copy to Clipboard” button, depending on your preferences.
6. Finally, save or paste the screenshot into your preferred image editing program, or share it with others as needed. Repeat these steps as needed to capture additional screenshots on your MSI laptop.
USING PRINT SCREEN FUNCTION
To take a screenshot on your MSI laptop using the print screen function:
1. Open the app or program that you want to capture a screenshot of on your MSI laptop.
2. Press the “Print Screen” or “PrtScn” button on your keyboard to capture the current screen image.
3. Open a new document or image editor, and paste the screenshot by pressing Ctrl+V
How to screenshot on MSI gs66 and gf63
There are several different ways to screenshot on an MSI gs66 and gf63 laptop, depending on your preferences and needs. One of the easiest methods is to use the default keyboard shortcuts, which typically involve pressing the “Print Screen” or “PrtScn” button on your keyboard along with one or more additional keys. Another option is to use a dedicated screenshot tool, such as the Snipping Tool or another third-party app, to capture specific windows or portions of the screen. Finally, you can also use built-in screenshot functionality from your laptop’s operating system, such as Windows’ built-in screenshot tool or the screenshot features available in macOS. To find out more about each of these options and how to screenshot on your MSI laptop, follow the steps below.
1. Open the app or program that you want to capture a screenshot of on your MSI gs66 laptop.
2. To take a screenshot of the entire screen, press the “Print Screen” or “PrtScn” button on your keyboard. If you only want to capture a specific window or area of the screen, press “Alt” and “PrtScn” together instead.
3. To save the screenshot to your computer, open a new image or document editor and press Ctrl+V or right-click in the document to paste the screenshot. Alternatively, you can also save the screenshot directly to your clipboard by pressing Ctrl+C or right-clicking and choosing the “Copy” option.
4. To share your screenshot with others, upload it to a cloud storage service or send it as an email attachment, depending on your preferences. Repeat these steps as needed to capture additional screenshots on your MSI gs66 laptop.
Where do screenshots go on MSI laptop
It depends on which method you use to take screenshots on your MSI laptop. If you use the keyboard shortcut or the Snipping Tool,your screenshots will be saved automatically in the Pictures folder on your device. Alternatively, if you take screenshots using the Fn and PrtScn buttons, your screenshots will be saved in your clipboard, and you can then paste and save the image as needed. In all cases, you can open any screenshot in your preferred image editing tool to crop, annotate, or otherwise customize the screenshot as needed.
Whether you prefer to take screenshots using keyboard shortcuts, dedicated screenshot tools, or your laptop’s built-in screenshot functionality, there are many options available for capturing and managing your screenshots on an MSI laptop. No matter what method you choose, the most important thing is to make sure that your screenshots are clear, easy to read, and properly organized so that you can find and use them as needed. Whether you want to take screenshots of app or program interfaces, social media posts, webpages, or other types of content, the key is to experiment with different techniques and find what works best for you. With a little practice and some good organizational tools, you can easily take and manage screenshots on your MSI laptop to save, share, and use as needed.


