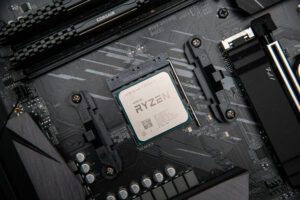
To install a cpu, first, identify the cpu socket on your motherboard and remove any protective covers. Next, align the notches on the cpu with the notches on the socket and gently lower it into place.
Installing a cpu is a crucial step when building or upgrading a computer. It can be a daunting task, especially for those who have never done it before. However, with the right tools and instructions, the process can be fairly simple.
Before beginning, it is important to ensure that the cpu is compatible with the motherboard. You must also be cautious when handling the cpu to avoid damaging the pins or contacts. Taking the necessary precautions will help you complete the task efficiently and effectively.


Credit: www.wired.com
Importance Of Installing Cpu Properly
Understanding The Significance Of Proper Cpu Installation
The cpu is the brain of your computer, and proper installation is crucial to ensure optimal performance. Here are the key points to keep in mind.
- Properly installed cpu can ensure maximum performance and speed for your computer.
- An incorrectly installed cpu can cause crashes, overheating, and other serious problems.
- Proper cpu installation can also prolong the life of your computer and its components.
Common Mistakes That Can Affect Cpu Performance
Here are some common mistakes that can affect the performance of your cpu:
- Failure to properly align the cpu with the socket
- Not securing the cpu with the retention mechanism
- Applying too much or too little thermal paste
- Leaving protective covers on the cpu before installation
- Not cleaning the cpu and socket before installation
Avoiding Risks And Maximizing Performance With Proper Cpu Installation
To ensure you avoid risks and maximize performance with proper cpu installation, consider the following:
- Read the manufacturer’s instructions on how to install the cpu and follow them carefully.
- Take time to prepare the area where you will be installing the cpu, ensuring it’s clean and free of debris.
- Check the compatibility of your cpu with your motherboard before purchase.
- Consider using an anti-static wrist strap to prevent electrostatic discharge.
- If you are not confident installing the cpu yourself, consider seeking professional help.
Remember, proper cpu installation is critical to ensure maximum performance and longevity of your computer. Take the time to research and follow the manufacturer’s instructions before installation.
Tools You’Ll Need For A Successful Cpu Installation
Before you get started with a cpu installation, it’s crucial to gather all the necessary tools. Here’s a list of essential tools you’ll need for a successful cpu installation:
Essential Tools For Cpu Installation
- Screwdriver (may vary based on the specific cpu socket type)
- Thermal paste
- Anti-static wrist strap
- Cleaning cloth
- Tweezers or small pliers (optional)
In addition to these essential tools, there are a few things you should do to prepare yourself for a safe and effective installation:
Preparing Yourself For A Safe And Effective Installation
- Power off and unplug your computer to avoid electrical damage and injury.
- Ground yourself by touching a grounded metal object or wearing an anti-static wrist strap to prevent static electricity from damaging your cpu.
- Read and follow the instructions that come with your cpu and motherboard to ensure proper installation.
Choosing the right components is also essential to a successful cpu installation. Here are some things to consider when selecting components:
Choosing The Right Components For Your Cpu
- Socket type: Make sure your cpu and motherboard have the same socket type for a proper fit.
- Thermal design power (tdp): Choose a cpu that matches the tdp supported by your motherboard to avoid overheating.
- Cooling solution: Consider using an aftermarket cooling solution for more efficient cooling, especially if you plan to overclock your cpu.
By following these tips and using the right tools, you can safely and effectively install a cpu in your computer.
Step-By-Step Guide To Installing Your Cpu
Are you interested in upgrading your computer’s processor or replacing a faulty cpu? Installing a new cpu may seem daunting, but it’s a relatively straightforward process that you can accomplish with some patience and care. In this guide, we’ll explain how to remove your old cpu and install a new one, ensuring that your computer runs smoothly.
Removing The Old Cpu
Before you install a new cpu, you’ll need to remove your old one. Here are the steps:
- Shut down your computer and ensure that it is unplugged from the power source.
- Open your computer case, locate your cpu, and gently remove the cooler by unscrewing it.
- Be careful not to touch any exposed electrical components, especially the cpu pins.
- Carefully lift the cpu out of the socket, taking care not to bend any pins or damage the cpu.
Preparing Your Motherboard For The New Cpu
Now that you’ve removed your old cpu, it’s time to prepare your motherboard for the new one. Here’s what you need to do:
- Verify that your new cpu is compatible with your motherboard. You can check this by referring to your motherboard’s manual or searching for it online.
- Remove any old thermal paste or residue from the cpu socket using a lint-free cloth or alcohol pads.
- Ensure that any protective covers or caps are removed from the new cpu, and hold it gently by the edges.
- Align the cpu with the golden triangle indicator on the socket and carefully place it down.
- Secure the cpu by gently lowering the retention arm, and ensure that it latches into place.
Installing The New Cpu
Now that your motherboard is ready, it’s time to install your new cpu. Here are the steps:
- Apply a small amount of thermal paste in the center of the cpu, making sure to spread it evenly in a thin layer.
- Attach the cpu cooler to the motherboard, aligning it with the cpu socket and securing it with screws or clips.
- Connect the cpu fan power connector to the motherboard.
- Reinstall any other components that you removed earlier, such as your computer case or graphics card.
- Connect your monitor, keyboard, and other peripherals, and plug in your power source.
Applying Thermal Paste
Thermal paste ensures that your cpu stays cool by conducting heat away from it. Here’s how to apply thermal paste:
- Use a pea-sized amount of thermal paste in the center of your cpu. Too much paste can cause overheating, so it’s important to use the right amount.
- Use a card or other flat object to spread the thermal paste evenly across the top of the cpu.
- Clean up any excess paste around the edges of the cpu using a lint-free cloth or alcohol pads.
Attaching The Cooler
The cpu cooler ensures that your cpu stays cool by conducting heat away from it. Here’s how to attach the cooler:
- Align the cooler with the cpu socket.
- Attach the pins, clips, or screws that came with your cooler.
- Connect the cpu fan power connector to the motherboard.
Testing Your New Cpu
Now that you’ve installed your new cpu, it’s time to test that it’s running correctly. Here are some steps to test it:
- Turn on your computer and check that your bios recognizes your new cpu.
- Check your cpu temperature using software like coretemp or hwmonitor.
- Run a benchmark or stress test to ensure that your cpu is working correctly and staying cool.
- Enjoy your new and improved computer performance!
Troubleshooting Common Cpu Installation Problems
Identifying Common Problems And Solutions
Installing a cpu can be a daunting task, and sometimes things don’t go as planned. Here are some common issues you might encounter, along with their solutions:
- Cpu not fitting: If your cpu doesn’t fit into the socket, make sure it is the correct socket for your cpu and that the lever is in the unlocked position. If it still doesn’t fit, double-check that you have the right cpu for your motherboard.
- Bent pins: Bent pins are a common problem when installing a cpu. If you notice the pins are bent, don’t panic! You can try to straighten them out with a needle or tweezers. Just be careful not to break them off.
- Thermal paste: Applying too much or too little thermal paste can lead to high cpu temperatures. The solution is to remove the cpu cooler, clean the surface of the cpu and cooler, reapply the thermal paste, and then reattach the cooler.
Fixing Common Issues With Incorrect Cpu Installation
If you encounter any of the following issues, they may be due to incorrect cpu installation:
- Blue screen of death (bsod): A bsod error can be caused by incorrect cpu installation or faulty components. Double-check that your cpu is installed correctly and make sure all cables and components are tightly secured.
- Overheating cpu: The cpu could overheat if it’s not installed correctly or if the thermal paste wasn’t applied properly. You may need to reinstall the cpu cooler.
- Computer won’t boot: If your computer won’t turn on after installing a cpu, it could be due to incorrect installation. Check that the cpu is seated properly and try resetting the bios.
Checking For Compatibility Issues
Before installing a cpu, it’s important to check for compatibility issues. Here are a few things to keep in mind:
- Socket type: The cpu socket on your motherboard should match the cpu you plan to install.
- Power requirements: Make sure your power supply can handle the cpu’s power requirements.
- Ram compatibility: Some cpus may require specific types of ram. Check your motherboard’s manual to ensure compatibility.
By following these tips, you can avoid common issues with cpu installation and ensure that your computer is running at peak performance.
Frequently Asked Questions For How To Install Cpu
How Do I Know Which Cpu Is Compatible With My Motherboard?
To determine cpu compatibility, check your motherboard’s manual or manufacturer’s website for supported cpu models.
What Tools Do I Need To Install A Cpu?
You’ll need a screwdriver, thermal paste, and possibly an anti-static wristband for safe installation.
How Do I Properly Apply Thermal Paste To My Cpu?
Apply a small drop or pea-sized amount of thermal paste to the center of the cpu, then gently spread it over the surface with a clean tool, such as a plastic card or spatula, until the surface is covered.
Conclusion
Installing a cpu can be a daunting task, but it doesn’t have to be. By following these simple steps, you can ensure that your cpu is installed safely and correctly. Remember to be gentle when handling your cpu, match the notches, apply thermal paste, and secure the components tightly.
Also, don’t forget to triple-check your work before turning your computer on. Once you’ve successfully installed your cpu, you’re all set to enjoy faster processing speeds and better performance from your computer. Make sure to regularly check for updates and keep your cpu properly maintained for longevity.
If you still encounter any issues during the installation process or while using your computer, don’t hesitate to reach out to a professional for help.


