To replace a cpu, first, turn off the computer and unplug all cables. Then, remove the cpu cooler and gently release the cpu from its socket.
Upgrading your computer’s cpu can help enhance its performance, speed and overall functionality. However, before you begin, ensure you have the proper tools to carry out this process. Additionally, make sure to select a compatible processor and check the motherboard specs to avoid any compatibility issues.
Replacing a cpu can be a daunting task, but it can be achievable with the right guidance. This article will guide you through the steps required to replace a cpu, ensuring you do not damage the delicate and vital components of your computer.

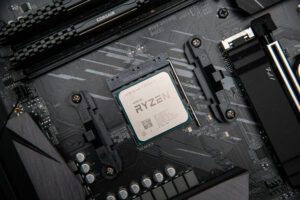
Credit: www.bairesdev.com
Step 1: Preparing For The Replacement
Understanding The Different Types Of Cpus And Motherboards
Before you start the process of replacing your cpu, it is essential to know the different types of cpus and motherboards. Knowing this will help you identify the specifications needed for the new cpu and the compatible motherboard.
- There are two main cpu manufacturers – intel and amd, and they have different sockets for their processors. The most commonly used for intel is the lga socket series, whereas amd uses am or fm sockets.
- Motherboards come in different sizes, and this affects the number of expansion slots, ports, and other features they have. The most common motherboard sizes are atx, micro atx, and mini itx. Ensure you know what size of the motherboard you have and get a compatible cpu.
Researching The Compatibility Of The New Cpu With The Existing Motherboard
After identifying the specifications needed for a new cpu, the next thing is to research the compatibility of the new cpu with the existing motherboard. If they are not compatible, you might end up damaging the motherboard or the cpu.
- Check the motherboard manufacturer’s website for compatibility information of cpus. Some motherboards can support different sockets, whereas others are limited to specific sockets.
- Verify the compatibility of the motherboard with the new cpu vendor. Ensure that the motherboard supports the required voltage, power, and speed needed by the new cpu.
Gathering The Necessary Tools And Equipment
To replace the cpu, you need to have specific tools and equipment.
- A screwdriver that fits the cpu cooler screws.
- Thermal paste
- Anti-static wrist strap.
- A work mat to prevent any damage to the cpu or the motherboard.
- Compressed air or a soft brush to clean the dust accumulation.
Preparing The Workspace
Finally, preparing the workspace is very important before starting to work on your computer.
- Choose a clean and clutter-free workspace where you can do your work freely. Clear off any metal objects or any liquids, which can accidentally spill and cause damage to your computer.
- Ensure proper lighting to avoid straining your eyes.
- Ground the anti-static wrist strap to a metal part of the computer case to avoid static discharge.
With these four steps complete, you are ready to start replacing the cpu with the new one. Remember to be gentle and take care while handling the computer parts. Happy upgrading!
Step 2: Removing The Old Cpu
Shutting Down The Computer And Unplugging All Cables
Before you begin the process of replacing your cpu, it’s essential to ensure that your computer is safely turned off and unplugged from all cables. Follow these steps to be on the safe side:
- Shut down your computer properly and wait for it to power down entirely.
- Unplug all the cables that are connected to your computer to avoid any accidents.
- Make sure you’re working on a stable and properly grounded surface.
Removing The Cooler And The Thermal Compound
It’s important to remove the cooler and the thermal compound correctly before removing the old cpu. Here’s how you can do it:
- Remove the cooler by unscrewing it from the motherboard. This may require a bit of force, but be gentle and careful not to damage any of the components.
- Clean the thermal compound from the cooler and the cpu using isopropyl alcohol and a lint-free cloth.
- Check the cooler’s mounting bracket and reapply thermal paste if needed before reattaching the cooler.
Carefully Removing The Old Cpu From The Socket
Now that you’ve removed the cooler and thermal compound, it’s time to safely remove the old cpu. Here’s what you need to do:
- Unlock the socket lever by lifting it gently.
- Carefully remove the old cpu from the socket by gently lifting it out. Be careful not to damage any of the components.
- Inspect the cpu for any signs of damage or wear before installing the new one.
- Save the old cpu somewhere safe in case you need it in the future.
Replacing your cpu can seem daunting, but following these simple steps can make the process go smoothly. Make sure to be extremely cautious while handling your computer’s components, and you’ll be on your way to upgrading your computer’s performance.
Step 3: Installing The New Cpu
Applying Thermal Paste Onto The New Cpu
Before installing your new cpu, it is important to apply thermal paste on it. This paste helps to conduct the heat from the cpu to the cooling system. Here are simple ways to apply the thermal paste to the new cpu:
- Clean the surface of the new cpu with a cotton swab and alcohol to remove any residue or dirt.
- Take a pea-sized thermal paste and place it in the center of the cpu.
- Using a credit card or a spatula, spread the paste evenly over the cpu surface.
- Do not apply too much thermal paste as it can overflow and damage your motherboard.
Carefully Placing The New Cpu Into The Socket
Once the thermal paste has been applied, it is time to install the new cpu to the motherboard. Here are some key points on how to properly place the new cpu into the socket:
- Ensure that the socket and the cpu are clean and free from dust and debris.
- Identify the location of the arrow on the corner of the cpu and socket to avoid incorrect placement of the cpu.
- Align the arrow on the corner of the cpu with the corresponding arrow indicator on the socket.
- Gently place the cpu into the socket, making sure it is level. Do not force it.
- Once the cpu is positioned correctly, close the socket lever to lock it in place.
Securing The Cpu With Its Retention Mechanism
Now, it’s time to secure the cpu with its retention mechanism. Here are the key points to consider while fixing the cpu:
- Make sure the cpu fan is disconnected for the time being.
- Push down the retention lever beside the cpu socket.
- The lever should move the retention bar to its release position.
- Align the metal bar with the notches on each side of the cpu.
- Lock the metal bar into place by lifting the retention lever.
Now, the new cpu is installed correctly, and it’s time to attach it to the cpu fan and start the computer. Remember to take care when executing each step to avoid damaging any of the components. Happy computing!
Step 4: Testing The New Cpu
Reassembling The Cooler And Its Components.
Now that you have successfully installed the new cpu, it’s time to reassemble the cooler and its components. Follow these steps to ensure a smooth process:
- Gently remove the old thermal paste from the cooler using a thermal paste remover or isopropyl alcohol.
- Apply a small amount of new thermal paste on the center of the cpu.
- Place the cooler back on top of the cpu.
- Secure the cooler in place with the screws or clips provided.
- Reconnect the fan cable to the motherboard.
Reconnecting All Cables And Powering Up The Computer.
After reassembling the cooler, the next step is to reconnect all the cables and power up the computer. Follow these steps:
- Reconnect all cables and devices, such as the cpu fan, power supply, and graphic card cables if applicable.
- Turn on the computer and enter the bios settings.
- Make sure that the new cpu is detected and configured correctly in the bios settings.
- Save and exit the bios settings.
Checking The Bios For Any Errors Or Issues.
Before proceeding to the next step of running cpu stress tests, it’s important to check for any errors or issues in the bios settings. Here’s what you need to do:
- Check for any warning or error messages in the bios.
- Ensure that the clock speed and voltage are set correctly for the cpu.
- Check for any compatibility issues with other hardware components.
Running Cpu Stress Tests To Ensure Optimal Performance.
Once you have completed all the previous steps, test the cpu’s performance to ensure optimal results. Here’s how to do it:
- Install a benchmarking software program such as prime95 or aida64.
- Run the cpu stress tests for at least 10 to 15 minutes.
- Monitor the temperature and clock speed during the test.
- Check the benchmark scores and compare them to the expected scores for the new cpu.
Replacing a cpu can seem daunting, but by following these simple steps, you can do it with ease. Remember to take proper safety precautions and to handle the cpu with care. Now that you know how to replace a cpu, you can upgrade your computer’s performance and enjoy faster speeds.
Happy computing!
Step 5: Wrapping Up
Reinstalling The Computer Case And Reconnecting All Peripherals
After successfully replacing the cpu, it’s time to put everything back together. Here’s how to do it:
- Carefully slide the computer case back into place and secure it using screws or latches, depending on the design of your computer case.
- Reconnect all the cables and wires that you disconnected earlier, such as the power supply cables and sata data cables if you removed any drives during the process.
- Double-check that everything is connected properly and securely before powering on the computer.
Finalizing The Installation Of The New Cpu
Before powering on the computer, there are a few final steps to complete the installation process:
- Reapply thermal paste to the top of the cpu, making sure to spread it evenly across the surface.
- Carefully place the heatsink or cpu cooler back onto the cpu, aligning the screws or clips and tightening them in place.
- If your cpu cooler has a fan, reconnect it to the motherboard’s cpu fan header.
- Finally, replace the computer case side panel and any screws or latches that hold it in place.
Tips For Maintaining And Upgrading The Cpu And The Computer
Congratulations, you have successfully replaced your cpu! Here are some tips to help you maintain and upgrade your computer’s cpu and overall performance:
- Monitor your cpu temperature regularly using software such as core temp or hwmonitor, as overheating can damage your cpu.
- Keep your cpu and heatsink or cooler clean and free of dust and debris, as this can cause temperature issues.
- Overclocking your cpu can increase its performance, but it also increases heat output, so make sure to monitor temperatures closely and make small adjustments.
- Always consult your motherboard’s manual and cpu compatibility list before upgrading your cpu to ensure compatibility.
- Upgrading your computer’s ram and storage can also boost overall performance.
Frequently Asked Questions For How To Replace Cpu
How Do I Know If I Need To Replace My Cpu?
You may need to replace your cpu if your computer starts to slow down, produces error messages or overheats, and if it’s outdated.
What Tools Do I Need To Replace My Cpu?
Before replacing your cpu, make sure to have all the necessary tools such as a screwdriver, thermal paste, and a grounding strap.
Can I Replace My Cpu Without Professional Help?
Yes, you can replace your cpu without professional help, but make sure to follow the manufacturer’s instructions and handle the hardware with care.
Conclusion
Replacing a cpu may seem daunting at first, but with the right tools and knowledge, it can be a straightforward process. As discussed in this guide, it is essential to carefully choose your new cpu and hardware components, prepare the computer, and then perform the installation with care.
Remember to take anti-static precautions to avoid damaging any of the internal components. It is vital to make sure everything is correctly connected to ensure your computer runs as smoothly and efficiently as possible. Any hardware upgrade is a great opportunity to clean up your computer and remove any unwanted files.
If you are new to hardware upgrades, it may take a few attempts to feel confident. But with a little time and practice, replacing a cpu will be a breeze. Good luck with your hardware upgrade!